Tuesday, 30 April 2013

airtel free gprs with operamini in may 2013

Hello my friends ,this time i am come beck with free and unlimited gprs trick for  airtel with uc web and opera mini handler.this trick is a frontquery proxy trick.so you get a lots of speed in your android and other mobile handset.this trick is  work 100%  and possible a highspeed downloading and browsing.this front query both work with handler and default browser. this proxy fine work in m.p.
mobile tips and tricks
airtel free gprs with operamini  in may 2013

airtel free gprs with operamini--- 
  • first create new account.
  • account name---mobile tips and tricks
  • proxy----64.72.1103.89
  • port------80
  • apn-------airtelgprs.com
  • homepage ---http://fb.me/cgi-bin/nph-proxy.cgi/000001a/http/
  • done
download uc and opera handler
  • install handler
  • put the front query--- http://fb.me/cgi-bin/nph-proxy.cgi/000001a/http/
  • all box are blenk
  • done now use free gprs in airtel network
                                                       please share this post in your friends

HOW TO ADD MULTI TABBED NAVIGATION WIDGET TO BLOGGER

The Multi Tabbed Navigation Widget enables you to Group all the Blog Gadgets in a single container,which can easily be selected via tabs.The main benefit of this widget is to save the Space of your blog,and you will get rid of scattered gadgets,however it also helps you to navigate the blog gadgets easily.Any one can see blog gadgets in a single container just by Clicking the Tab of the specific Gadget.There are several ways of creating tab-views for blogger like jQuery, or with the help of tools,or any script.

How To Add Tabbed Navigation Widget To Blogger


  • Now Expand the Style Section of the Template,just by Clicking the arrow near <b:skin> ... </b:skin> at line 14.
  • Now Search for this Tag ]]></b:skin>
  • Now just above ]]></b:skin> tag add the below script
/* ThatsBlogging Tabview for Blogger
----------------------------------------------- */
.tabviewcont{
margin:15px 0;
padding:0;
clear:both;
}
.tabviewnav {
margin: 0 0 0 14px;
padding:3px 0; /* If you are using a Blogger Template change 0 with 15px */
font-size:12px; /* Font size of text inside tabs */
font-weight:bold;
}
.tabviewnav li {
list-style:none;
margin:0;
display:inline;
}
.tabviewnav li a {
padding:3px 6px;
margin-right:1px;
background:#F6F6F6; /* The background color of the tabs */
border-radius:5px 5px 0 0;
-moz-border-radius:5px 5px 0 0;
-webkit-border-radius:5px 5px 0 0;
text-decoration:none;
color:#222222;
}
.tabviewnav li a:hover {
color:#222222;
background:#EBEBEB; /* Background color of the tab on mouseover */
text-decoration:none;
}
.tabviewnav li.tabviewactive a,
.tabviewnav li.tabviewactive a:hover {
background:#EBEBEB; /* Background color of the active tab */
color:#222222;
}
.tabviewcont .tabviewtab {
padding:5px;
border:1px solid #EEEEEE; /* Border around the container */
background:#fff; /* The background color of the gadget */
}
.tabviewcont .tabviewtab h2,
.tabviewcont .tabviewtabhide {
display:none;
}
.tabviewtab .widget-content ul{
list-style:none;
margin:0 0 10px 0;
padding:0;
}
.tabviewtab .widget-content li {
border-bottom:1px solid #ccc;
margin:0 5px;
padding:2px 0 5px 0;
}


  • Now find </head> Tag
  • Now Copy The Below Script and paste it above </head> Tag
<script type='text/javascript'>
// Tabview for grouping gadgets
//<![CDATA[
document.write('<style type="text/css">.tabview{display:none;}<\/style>');function tabviewObj(argsObj){var arg;this.div=null;this.classMain="tabview";this.classMainLive="tabviewcont";this.classTab="tabviewtab";this.classTabDefault="tabviewtabdefault";this.classNav="tabviewnav";this.classTabHide="tabviewtabhide";this.classNavActive="tabviewactive";this.titleElements=['h2','h3','h4','h5','h6'];this.titleElementsStripHTML=true;this.removeTitle=true;this.addLinkId=false;this.linkIdFormat='<tabviewid>nav<tabnumberone>';for(arg in argsObj){this[arg]=argsObj[arg]}this.REclassMain=new RegExp('\\b'+this.classMain+'\\b','gi');this.REclassMainLive=new RegExp('\\b'+this.classMainLive+'\\b','gi');this.REclassTab=new RegExp('\\b'+this.classTab+'\\b','gi');this.REclassTabDefault=new RegExp('\\b'+this.classTabDefault+'\\b','gi');this.REclassTabHide=new RegExp('\\b'+this.classTabHide+'\\b','gi');this.tabs=new Array();if(this.div){this.init(this.div);this.div=null}}tabviewObj.prototype.init=function(e){var childNodes,i,i2,t,defaultTab=0,DOM_ul,DOM_li,DOM_a,aId,headingElement;if(!document.getElementsByTagName){return false}if(e.id){this.id=e.id}this.tabs.length=0;childNodes=e.childNodes;for(i=0;i<childNodes.length;i++){if(childNodes[i].className&&childNodes[i].className.match(this.REclassTab)){t=new Object();t.div=childNodes[i];this.tabs[this.tabs.length]=t;if(childNodes[i].className.match(this.REclassTabDefault)){defaultTab=this.tabs.length-1}}}DOM_ul=document.createElement("ul");DOM_ul.className=this.classNav;for(i=0;i<this.tabs.length;i++){t=this.tabs[i];t.headingText=t.div.title;if(this.removeTitle){t.div.title=''}if(!t.headingText){for(i2=0;i2<this.titleElements.length;i2++){headingElement=t.div.getElementsByTagName(this.titleElements[i2])[0];if(headingElement){t.headingText=headingElement.innerHTML;if(this.titleElementsStripHTML){t.headingText.replace(/<br>/gi," ");t.headingText=t.headingText.replace(/<[^>]+>/g,"")}break}}}if(!t.headingText){t.headingText=i+1}DOM_li=document.createElement("li");t.li=DOM_li;DOM_a=document.createElement("a");DOM_a.appendChild(document.createTextNode(t.headingText));DOM_a.href="javascript:void(null);";DOM_a.title=t.headingText;DOM_a.onclick=this.navClick;DOM_a.tabview=this;DOM_a.tabviewIndex=i;if(this.addLinkId&&this.linkIdFormat){aId=this.linkIdFormat;aId=aId.replace(/<tabviewid>/gi,this.id);aId=aId.replace(/<tabnumberzero>/gi,i);aId=aId.replace(/<tabnumberone>/gi,i+1);aId=aId.replace(/<tabtitle>/gi,t.headingText.replace(/[^a-zA-Z0-9\-]/gi,''));DOM_a.id=aId}DOM_li.appendChild(DOM_a);DOM_ul.appendChild(DOM_li)}e.insertBefore(DOM_ul,e.firstChild);e.className=e.className.replace(this.REclassMain,this.classMainLive);this.tabShow(defaultTab);if(typeof this.onLoad=='function'){this.onLoad({tabview:this})}return this};tabviewObj.prototype.navClick=function(event){var rVal,a,self,tabviewIndex,onClickArgs;a=this;if(!a.tabview){return false}self=a.tabview;tabviewIndex=a.tabviewIndex;a.blur();if(typeof self.onClick=='function'){onClickArgs={'tabview':self,'index':tabviewIndex,'event':event};if(!event){onClickArgs.event=window.event}rVal=self.onClick(onClickArgs);if(rVal===false){return false}}self.tabShow(tabviewIndex);return false};tabviewObj.prototype.tabHideAll=function(){var i;for(i=0;i<this.tabs.length;i++){this.tabHide(i)}};tabviewObj.prototype.tabHide=function(tabviewIndex){var div;if(!this.tabs[tabviewIndex]){return false}div=this.tabs[tabviewIndex].div;if(!div.className.match(this.REclassTabHide)){div.className+=' '+this.classTabHide}this.navClearActive(tabviewIndex);return this};tabviewObj.prototype.tabShow=function(tabviewIndex){var div;if(!this.tabs[tabviewIndex]){return false}this.tabHideAll();div=this.tabs[tabviewIndex].div;div.className=div.className.replace(this.REclassTabHide,'');this.navSetActive(tabviewIndex);if(typeof this.onTabDisplay=='function'){this.onTabDisplay({'tabview':this,'index':tabviewIndex})}return this};tabviewObj.prototype.navSetActive=function(tabviewIndex){this.tabs[tabviewIndex].li.className=this.classNavActive;return this};tabviewObj.prototype.navClearActive=function(tabviewIndex){this.tabs[tabviewIndex].li.className='';return this};function tabviewAutomatic(tabviewArgs){var tempObj,divs,i;if(!tabviewArgs){tabviewArgs={}}tempObj=new tabviewObj(tabviewArgs);divs=document.getElementsByTagName("div");for(i=0;i<divs.length;i++){if(divs[i].className&&divs[i].className.match(tempObj.REclassMain)){tabviewArgs.div=divs[i];divs[i].tabview=new tabviewObj(tabviewArgs)}}return this}function tabviewAutomaticOnLoad(tabviewArgs){var oldOnLoad;if(!tabviewArgs){tabviewArgs={}}oldOnLoad=window.onload;if(typeof window.onload!='function'){window.onload=function(){tabviewAutomatic(tabviewArgs)}}else{window.onload=function(){oldOnLoad();tabviewAutomatic(tabviewArgs)}}}if(typeof tabviewOptions=='undefined'){tabviewAutomaticOnLoad()}else{if(!tabviewOptions['manualStartup']){tabviewAutomaticOnLoad(tabviewOptions)}}
//]]>
</script>
  • Now Search for <div class='column-right-inner'> or <div id='sidebar-wrapper'> (it will look like the below screenshot)

  • Now Paste The Following Script Just above this Script <div class='column-right-inner'>
<div class='tabview'> 
<b:section class='tabviewtab' id='Tab1' maxwidgets='1'/>
<b:section class='tabviewtab' id='Tab2' maxwidgets='1'/>  
<b:section class='tabviewtab' id='Tab3' maxwidgets='1'/> 
</div>
  •  And That's it,Now Go To Layout Section,you will see there 3 New Areas for adding Gadgets.

Changes And Implementation 

If you want to add any Gadget to the list of single Container,just Click On Add a Gadget,and Drag the Gadget to that section.Now if you are interested in adding more Tabs,then follow the below steps.
  • In the Above last one step we have highlighted </div> ,now if you want to add new tab just add the below script before </div> Tag,and that's it.
<b:section class='tabviewtab' id='Tab4' maxwidgets='1'/>


  • Note : If you are adding new tab,then use different ID for each tab,e.g for tab 6 use "Tab6" in the script.
  • Next Important Point is that if your Template sidebar is too short they don't add long and high width Gadget to this Widget.
  • ! important ! : This Widget may slow your Blog Loading Speed, because this widget is lil bit heavy.
  • Note:- If your Blog Sidebars is too short it will not work perfect,either it will just show title or nothing 

Is Microsoft taking advantage of Samsung-Apple rivalry ?

In the latest Microsoft ad, the issue of Apple vs. Samsung has been highlighted to make the Lumia 920 stand out. Does itwork though?


The advertisement, now on the Windows Phone Channel, begins with an innocuous enough wedding when all the attendees takeout their phones, and we clearly see that one side of the aisle are Samsung aficionados while the other side is Apple. One guest gets up with his ‘ Galaxy Note II ’ phablet which draws the remark from the Apple side “Would you mindmoving your enormous phone? ’A few more snide remarks later a Samsung guest calls them ‘i-sheep’ and another lady gets up and says ‘Autocorrect this!’and lands a punch on an Apple guest’s face.


Chaos ensues with exaggerated punches and kicks sending people flying all around the wedding aisle, a noteworthy one being when one guest is smashed on the face by a Galaxy Note sending him flying across the hall. Amidst all this violence are two calm and collected waiters on their colourful Nokia Lumia 920’s (in contrast to the black and grey Apple and Samsung devices) who ask each other ‘Do you think if they knew about the Nokia Lumiathey would stop fighting all the time?’ to which the replyis “I think they like fighting”.


The slogan of the new ad


Now the Nokia Lumia gets very little screen time here,and the focus is on the ridiculous Apple-Samsung rivalry. By showing that only two waiters have this phone, Microsoft is trying tostand out by distancing itself from the other phones instead of directly competing with them.

Alas, jokes will still be made at Microsoft’s expense.
For example, one online comment says “The Microsoft ad for Windows Phone is highly accurate. In a room full of people, there are only two Lumia owners."This remark is not too far from the truth as Apple and Samsung right now are capturing 103 percent of market profits , a percentage which is possible because of losses incurred by rival companies, one of which is Nokia. Nokia suffered a $3 billion loss in 2012, and the Lumia 920 will be seen as its saviour.


This is not the first time Microsoft has released an ad like this. In November 2012, they had attacked Google with the hope of elevating its Search engine Bing , which we now know delivers five times more malware than Google.

Airtel new confirmed superfast frontquerry working in all handlers all over India

Hello Everyone,

Welcome Back To NoGravityZone.

The Only One Place Where Nothing Is Impossible.


First of all I am sorry for not providing you latest working tricks in lats few days because I was busy in my study.
But I am back again to give you some latest working tricks.

I am here with a Front query trick for Airtel for downloading large files as well as for browsing.
With this Front query trick you can download and browse at very fast speed and you can Use This Trick in Mobile OR Computer.
This trick is working all over India.

As we all know that now most of tricks for free internet are not working as airtel blocked them but I am still providing you latest working tricks.

With this front query trick you can enjoy high speed unlimited browsing and downloading in airtel 3G network.


So here we go.

Benefit of this Airtel Proxy trick:
· No registration : - No sign up required as this is a proxy trick.

· Working all over India : - working in most of states of India.

· Zero balance condition: - Working at zero balance

· Default Apn : - airtelgprs.com

· Supported: - YouTube, Facebook and free downloads.

· Download status : - you can download file in parallel and resume it.

· High speed : giving full 3g speed. For getting uncapped speed use our speed capping solution.

· Supports all major platforms: Device supported is S40, S60 and latest android platform.

· No Sim Blocking: No issue of sim Blocking. If your Sim is blocked thenuse our trick to unblock it.


Steps to setup this trick:
Here I am only providing tutorial only for how to configure this trick in mobiles.

Follow Below Instructions:-


As this is a Front query you will need to download a handler application.


Then just create a new configuration profile with these settings.

· Account name : - NoGravityZone.

· Apn:- airtelgprs.com

· Proxy:- 174.120.153.2

· Port:- 80

Now save these settings.


Launch any opera Mini or UC handler and enter the following front query in Front Query Field


Front Query: live.airtelworld.com/~plxweb/nph-act.cgi/010110A/http/


And In
PROXY TYPE : Real Host


proxy server: live.airtelworld.com


That’s it save these setting and you are done now enjoy unlimited browsing and downloading.


Though I get average Airtel 3G Signal at my place the download Speed was around 400 kbps on 3G mode, normally thetransfer speed will be approx 600 kbps in UMTS Mode.
if you are hungry for Free Internet from long time then I Recommend you to tweak this latest front query on your mobile andenjoy your Internet needs.


FOR PC USERS

Pc user also can use this trick wth the help of Vnap buster.

Download Vnap Buster
HERE


You will need to install .NET framework 4.0
Download it if you don’t have from here


WE NEED YOUR FEEDBACK PLEASE COMMENT HERE IF THIS WORKS FOR U .

tata docomo 3g front query trick in uc may 2013


 this time i am a post a fresh and newest 3g highspeed front query trick for tata docomo.this front query proxy is based on flyproxy. so you get a high speed gprs in your mobile and pc(laptop) this trick all mobile handset supported like android,java and many more.this proxy is fine work in raj,bihar and tamilnadu.u can use this front query in uc web handler for better speed.

tata docomo trick
tata docomo front query for uc


features of tata docomo front query proxy
this proxy you are both use in mobile and laptop.this proxy trick give you a high speed exp. in docomo 3g circle and other circle are 253-750 kbps.this proxy fine working in divein default apn.

config. proxy
first download uc web handler install your mobile.second use default divein setting of docomo and put front query other box is blenk.save and  use high speed 3g in your mobile you are also use vnap booster for  pc.

Apply to be a Chitika Publisher!front query-----divein.tatadocomo.com/mebapp.com/power/logtyped/http/


                                                please try in your state and give a  comment

idea highspeed Proxy 3g trick for may 2013

today i am posting a newly fresh high speed 3g proxy for idea user. this proxy get awesome speed in all over india. i also get the speed 1.1 mbps. you are also try my last idea trick post idea high speed 3g trick with tcp-443 in april 2013  is very fine work in many state like raj.and mumbai


features of proxy
  1. high speed download
  2. no speed capping
  3. unlimited browsing
  4. no sim block
  5. not any handler req.
  6. use as default setting
setting for mobile
  1. create new account
  2. put the proxy-----128.57.41.142
  3. port--------------80
  4. apn --------------internet
  5. save and restart mobile.

How to 100% Free Call From PC To Mobile Or Landline Phone

There is a very simple trick to make FREE calls from your PC to any Mobile or Landline of your choice to any corner of the world.
This sounds unbelievable.
But it is true. In my next few lines I am going to disclose the trick and after you read it fully, you will make your first call and post your comment in this article thanking me a lot, I am sure about it.
=> Steps to Make Free Phone Calls
1. Install YAHOO MESSANGER which supports the VoiceMessage (Latest Version).
http://rd.software.yahoo.com/msgr/11/msgr11in.exe
2. Log-in to your Yahoo Messanger.
3. Configure your Microphone and Head phone.
4. Click on Yahoo Voice.
5. Dial the number 1800-3733-411 (This number is a toll free number and all calls are free to this number).
6. Your call will be connected and operator will welcome you. The voice from the operator will give you various options (as we listen in our mobile when we call the customer care center). The last option is FREE CALL. You have select your option by saying it. So say loudly on your microphone FREE CALL.
7. After this, you will listen a small advertisement which is actually connecting you to the FREE CALL service. Wait until you liste ''PLEASE DIALYOUR NUMBER''
8. Dial your COUNTRY CODE first followed by your Mobile Number or Phone Number (this will be followed by regional code too). For example for India it is 91. If youwant to dial a number called 9444754456. Then you have to dial like this 919444754456.
9. Your call will be connected and this call is limited upto 5 minutes only. Still not less time for free. You can try to reconnect it and follow the same procedure as mentioned above.

Airtel 3G Unlimited GPRS Trick With Fastest Proxy May 2013

Use these setting sand enjoy free internet on 0 balance working.
Don't know how to set proxy?
1. Go to start menu
2. Go to Internet options (type internet options)
3. Click connections
4. Select your connection name
5. Double click it or click on it and click settings
6. Check use a proxy server and enter proxy desired.
7. Go to google chrome or internet explorer and enter home page and its done.
Proxy: 50.22.79.99
Port: 80
Do the settings above in your browser.
Home Page: 122.170.122.216
or
203.115.112.27
or
122.170.122.202
or
203.115.112.5
or any other free page working in your state.

How to find Best Phones under 20000 Rs in India (Mobiles Near 20K)


Today I am going to share best phones under 20000 rs or near 20K in India. If you are thinking of buying a new smartphone and there is no problem with you regarding budget, then you will have a lot of options to go for; like, iPhone 5, HTC One, Galaxy S IV, Nokia Lumia 920 and many more. Taking any of these smartphones home, most probably you will end up as a satisfied customer as each of these phones have almost all the features you are looking for, incredible design and the fastest processor available in the market.  Problem starts when you look for a smartphone in a country like India (One of the biggest markets of Smartphones), where people usually go for limited budget smartphones under 20000 or 25000 or you can say best phones under 20000 rs. When you go for a limited budget smartphone, you need to be smart enough in choosing one as many of them may have some key features missing, which you were really looking for.  This post is dedicated to all those middle class people who want to buy a smartphone with limited budget of 20000 Rs ($400 approximately). So, here we are providing the list and features of best phones under 20000 rs in India

Best Phones Under 20000 Rs in India

Given below, are the 5 best smartphones below 20000 Rs in India.
best phones under 20000

1. Micromax A116 Canvas HD: Best mobile phone under 20000 Rs

There is no stopping for the brand Micromax in India, where people generally look for the phone which gives them the best value for their money.  Company is regularly launching high end versions of its best smartphones. They have launched best smartphones under 15000 rs and 10000 rs. Micromax A116 Canvas HD also is the upgraded version of Micromax Canvas A110 which wasthe best phone under 10000 rs. Micromax A116 Canvas HD has just raised the bar for the mid-range smartphones by using 1.2 GHz MediaTek MT6589 quad-core ARM Cortex-A7 CPU and PowerVR SGX544MP chip for processing graphics. It has been launched with android 4.1 Jelly Bean Operating system with 1 GB RAM.  Phone has dual SIM support for both 2G & 3G networks.  It has a big 5 inch IPS LCD Capacitive Touchscreen with screen resolution of 1280 x 720 pixels. It weighs less (157 gm.) than that of its predecessor version A110 (168 gm.), it is so easier to carry. Canvas HD has 4 GB Internal memory storage with expendable memory support upto 32 GB with the help of microSD card. Primary camera is an 8 MP as used in its previous version A110 and front camera is of 2 MP which is quite helpful in video calls/recording.  Phone has a 2100 mAh battery which is quite good in this price range. Price of Micromax Canvas A116 HD is 13800 Rs in India. Without a doubt this is the best phone under 20000 rs atleast in India, as its features are comparable to that of Samsung Galaxy Grand itself which costs at around 20000 Rs. So Canvas HD is on top spot in this list of best phones under 20000 Rs.
2. Lava Xolo X1000
Lava Xolo X1000, with Intel Processor is coming up as a new addition to the brand’s smartphone lineup. Some people are saying that this would be the best phone under 20000 Rs. It is a dual SIMsmartphone, which runs on Android 4.0 Ice Cream Sandwich (upgradable to Jelly Bean) Operating System.  The device is coming up with 2 GHz Intel Atom Processor with Hyper Threading Technology and 1 GB RAM. It is packed with 400 MHz GPU (Graphics Processing Unit) which is built to enhance the realistic gaming experience for the gamer. Lava Xolo X1000 smartphone has a 4.7 inch capacitive touch screen with resolution of 1280 x 720 pixels. Rear camera for the smartphone counts at 8 MP, which is quite decent in this price range.  Front Camera of 1.3 MP also is quite handy in making video calls.  Phone has an internal storage of 8 GB which can be expended 32 GB more by the help of external memory.  This phone costs at around18500 INR in India.  So this phone definitely deserves a place in this list of best phones under 20000 Rs.
3. Samsung Galaxy Grand Duos
This is one of the best phones under 20000 rs. Samsung, the largest smartphone maker of the world has come up with one of its best mid-range smartphone under 20000 rs having dual SIM support in it. It is coming up with 1.2 GHz Dual Core Processor with 1 GB of RAM, which runs on Android V 4.1.2 (Jelly Bean) OS. As the name suggests it has a pretty big LCD capacitive touch screen of 5 inches. It is of good dimensions (143.5 mm x 76.9 mm x 9.6 mm), weighs around 162 gm.  The phone has an internal storage of 8 GB with external memory card support upto 64 GB.  It has a primary camera of 8 MP with Autofocus & LED flash facility; Secondary camera as well is quite decent with 2 MP count.  Phone has a Lithium Ion battery of 2100 mAh, which is one of the best in this price range.  Price of Samsung Galaxy Grand is almost 19500 rs in india, which makes it one of the best phones under 20000 rs.
4. Nokia Lumia 720
If you love to have a windows phone rather than an android phone, Nokia Lumia 720 is definitely the phone you can go for.  Like its predecessor Nokia Lumia 720, it is blessed with reliable hardware. It runs on Windows Phone 8Operating System & uses microSIM like most of the new smartphones. It comes with 1 GHz Dual Core Processor with 512 MB of RAM. Phone has an internal storage of 8 GB with external memory card support upto 64 GB.  It also has a decent display screen like otherNokia Lumia series smartphones, but instead of AMOLED it uses IPS LCD panel for display.  It is quite thinner (9 mm) than that of Nokia Lumia 800 (12.1 mm), so easier to carry. It comes with 4.3 inches capacitive touch screen with screen resolution of 800 x 480 pixels.  Primary camera forNokia Lumia 720 is of 6.7 MP, 3088 x 2152 pixels with LED flash option. Though camera counts only 6.7 MP, it is comparable to 8 MP camera of other smartphones.  It also has a secondary camera of 1.3 MP which is quite decent.  It has a Standard Li-Ion battery of 2000 mAh, which is quite good at this price range.  Price of Nokia Lumia 920 in India is almost 17000 INR and these features make it one of the best phones under 20000 rs.
5. HTC Desire SV
On mid-range smartphone category HTC, known for its brand value & innovative designs has come up with its HTC Desire SV smartphone, which is one of the best in mid-range phones near 20,000 rs or 20K right now. It is a dual SIM smartphone which runs on Android OS, v4.0.4 (Ice Cream Sandwich), upgradable to 4.1.2 (Jelly Bean). The phone is blessed with Dual-core 1.2 GHz Qualcomm Snapdragon MSM8960 processor. The phone is having 4.3″ Super LCD 2 capacitive touch screen. It has 5 MP Primary camera with auto focus, LED flash, 1.6 MP secondary camera and video stabilization of 1080p@30fps. It has 4 GB internal memory and micro SD card support upto 32 GB.  Only problem with HTC Desire SV is its battery, which is of 1650 mAh. Beside all other features it provides you 25 GB of Dropbox storage space. Price of HTC Desire SV in India is almost 17000 Rs or 17k. This is the last phone in this list of best phones under 20000 rs.

idea highspeed 3g trick may 2013


welcome to
 mobile tips and tricks. today i am posting a newly fresh highspeed 3g proxy for idea user. this proxy get awesome speed in all over india. i also get the speed 1.1 mbps. you are also try my last idea trick post idea high speed 3g trick with tcp-443 in april 2013  is very fine work in many state like raj.and mumbai


features of proxy
  1. highspeed download
  2. no speed capping
  3. unlimited browsing
  4. no sim block
  5. not any handler req.
  6. use as default setting
setting for mobile
  1. create new account
  2. put the proxy-----128.57.41.142
  3. port--------------80
  4. apn --------------internet
  5. save and restart mobile.

Micromax Swipe ‘n’ share app leaked | CuteTrick

Hello Friends Today I am Posting Leaked Micromax Awipe 'n' Share app. Some of the Micromax Handsets specially the Bolt series came with a unique app called Swipe ‘n’ share that allowed the user to transfer data from one phone to another using Wi-Fi. The transfer is fast and easy and there is no need to pay the data charges.
Micromax Swipe ‘n’ share app leaked | CuteTrick

The same Swipe ‘n’ share app has been leaked and now available. The app works with Android version 2.3.x and over. The app makes use of the Wi-Fi network and connects the two handsets that need to be within the Wi-Fi range. The transfer takes place directly over the Wi-Fi and it’s very fast.

To install you need to first download the app and then extract the zip and install it as you would do with any other android app.

The app needs to be installed on both the handsets. Once done open the flash transfer app (on both the handsets) and create connection (from any one handset). Accept the request (on the other handset) and start sharing your files. What’s more you can also create a group and transfer data simultaneously with up to 8 friends at a time. You can use swipe to transfer or share to transfer or simply click.


>>> ANY PROBLEM PLEASE COMMENT <<<

Micromax Swipe ‘n’ share app leaked | CuteTrick
Reviewed by KAILASH PALIWAL on Apr 30 2013
Rating: 5

Monday, 29 April 2013

TOP 5 PROFESSIONAL FREE WORDPRESS THEMES 2013

WordPress; WordPress is a free Blogging Tool,andCMS(Content Management System).WordPress use PHP and MySQL Languages for editing,modifying or installing Plugins.Creating WordPress website is not difficult,but finding a beautiful theme for WordPress Blog is lil bit hard work.So in this regard we have collected Top 5 Professional Free WordPress Themes which will surely solve your Problem of finding and wasting time on Finding Themes for WordPress Blogs.Actually theme is soul of your blog,it will reflect your personality and your blog personality.

Features Of Top 5 Professional Free WordPress Themes 2013

  • Professional Look
  • Ads Ready,SEO Ready
  • Right,Left Sidebars
  • Top Navigation menus
  • Simple and Clean
  • Custom Headers 
  • Custom Backgrounds
  • Automatic Feed Links
  • Work With All Browsers i.e Google Chrome, Mozilla and Firefox

Top 5 Professional Free WordPress Themes 2013

Finding Professional Themes for WordPress is very hard,but when Quality is your First Priority,then you have to find the awesome theme for your WordPress Blog.So here is Top 5 Professional Themes,i hope you will found it interesting.

1# Rusty Grunge Professional WordPress Theme


2# CryBook Professional WordPress Theme

CryBook WordPress Themes has 3 Columns Layout,it has 2 right sidebars along with many other widgets.Its look is like Facebook which makes it more attractive Template.
crybook-professional-wordpress-themes


3# Max Professional WordPress Theme

max-professional-wordpress-theme


4# Blog Theme Professional WordPress Theme

blogtheme-professional-wordpress-theme


5# Androida Professional WordPress Theme


HOW TO AUTOMATICALLY PUBLISH BLOGGER POSTS TO FACEBOOK,TWITTER AND OTHER SOCIAL NETWORKS

Social Networks is the backbone for your Blog Traffic.Never underestimate the strength of Social Networking Websites,actually every social networking website is getting  million of hits daily,and if you share your blog post/content there,then surely you can get a flood of traffic to your Blog.Now every Blogger is sick of posting his/her blog posts daily to Facebook,Twitter or other social networking sites,but here we have found an awesome trick via which you can Automatically Publish Your Blogger Posts to Facebook,Twitter, or any Other Social networking website.For installing this Service follow the below easy steps.


How To Automatically Publish Blogger Posts To Facebook And Other Social Sites

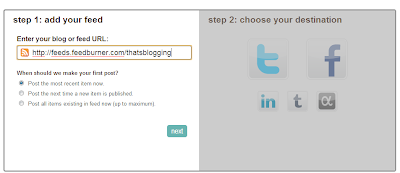
  • Visit DLVR.it
  • Now Sign up there,by filling the form with required Data
  • After Entering Email and Password , click on Sign Up.
  • Now Go To Your email inbox and Confirm your Email Address
  • Now it will redirect you to another Page where you have to enter your Blog Feed Burner Username 
  • Click On Twitter Icon at the right side,Now it will redirect you to twitter account,there enter E-mail and Password and Click on Authorize App
  • Now your Blog Posts will Automatically Publish to your Twitter Account
  • Now For Facebook Click On The Facebook Icon at the right side,it will redirect you to Facebook,there enter your username and password,after that they may ask you about Page username i.e Fan Page
  • Enter that and Save Changes

So What's Up

Automatically Publishing Blogger Posts to Social Networking Sites will certainly help you to generate a flood of traffic to your Blog,as i mentioned never underestimate the Social Websites,because you can get alot of traffic to your Blog,However if you apply this service to your Blog,i am sure you will get high traffic.

Question :- How to Apply this Service for Google +?
Answer :-   Actually Now when you post a Content on your blog,after Publishing Blogger Ask you for sharing that Post to Google + ,means they Provide this feature builtinly.

GOOGLE ADSENSE PIN - WHAT TO DO IF ADSENSE PIN NOT RECEIVED


One of the most awful problem in Google Adsense is reaching of Pin from Google Adsense Team.Actually Google send its Publishers a Personal Identification Number (PIN) which is enclosed in a small white envelop for the verification of his/her Postal Address.Google sends this Code (PIN) when you earning threshold reaches 10$ (Dollers),they inform you when they issue this PIN.Now the problem is how we can receive this PIN?Many Question Comes and we have faced it too many times?How much Time it takes to reach Adsense PIN? I am not receiving my Adsense PIN?My PIN has been issued but i haven't received it?All the Problems comes up with The Country i.e from where you are ? Are You Pakistani ? Are you Indian ? or any Asian Country?I don't know exact why Google Adsense hates these Countries? In Pakistan Our postal service is very poor,therefore one can't receives his/her PIN in time.Actually Google Adsense Team ensure you that you will receive your Adsense PIN in just 2-3 Weeks or Less then 2-3 days,it depends upon the postal service Of your Country.According to my Experience you can receive the Google Adsense Pin but if you provide the data in correct manner,this is what i did wrong 2 times and i haven't received my  Adsense PIN and atlast when i correct the Contact Details,within 15 days i received my Adsense Pin from Google Adsense Team.The sequence of Details was as under.


  • House No,Room No or any Organization,Office and School
  • Street Address (Clear and well known place)
  • Postal Code/Zip of Your Area (i.e Postal Code of Peshawar is 25000)
  • City Name
  • And Country 
Now if you have followed the above steps correctly,i can guarantee within 2 weeks you will receive your Adsense PIN.

Why Google Adsense Team Send PIN?

The aim of sending the Adsense PIN to Publishers is to ensure the publisher that he/she is really the resident of a specific country which One has enter in One's Google Adsense Account.And the 2nd most important aim is that to ensure the Publisher receives his/her Cheque of earnings which is sent by Standered mail.

What If I Didn't Enter My Adsense PIN


Actually when you got the Google Adsense PIN,then Google Adsense Team allow you to enter the PIN Code which is 6 numbers code within 6 months and if you not enter your PIN within 6 months,Google Adsense Team will stop showing ads on your Blog/Website,now to get rid of this problem enter the PIN and by entering PIN the Payment Hold will be removed.Remember,don't enter the PIN wrongly i.e if you type your Code 3 times wrongly your Google Adsense Account will be disabled/suspended and then you will weep for a week :D,so always be attentive don't try to become a lazy bum :)

Adsense Pin Still Not Received What To DO?

Now if you still haven't received the Adsense then follow the below steps to Remove Payment On Hold from Adsense Account.
  • Go To Your Adsense Account
  • Click On Payment Option
  • Now You will see an Option at that Page i.e Request for new PIN Code,Just Click On That and request for new One
  • Now wait for 3 weeks,and again request for the PIN.
  • Now time to get rid of " On Hold ",this time after 3 weeks i.e 21 days you will see another option at that page which will lead you to another page/forum which can easily help you to request the Adsense Team to verify your Address Manually.
  • Click On that Link,it will redirect you to a form where you have to enter your Publisher ID,name and other information.
  • But the most important they will ask you about to provide a Scanned Copy of your Government Issued Card or ID Card which contain the details of your residence.You must provide an ID in which the detail about the Adreess matches with the Adsense Contact Address.
  • Now when you upload the ID
  • Google Team will email you in 5 minutes and will inform you that "Congratulations ! You will never have to enter the PIN in future,Adsense Account Payment Hold is removed Regards Adsense Team."
  • And that's it :)